Exploring the New Features in FL Studio 21: What's Changed?
Posted by Esteban Miranda on
As music producers today, we're fortunate to live in an age where software updates exist. Imagine living in a time where if you wanted a better version of some of your music gear, you had to go and buy the updated model?
Luckily, in the digital world of music software, updates are a thing, and this means that often times your favourite synth or even full DAW will get a big update with some new features. One of the most attractive things about FL Studio from a consumer standpoint is the Lifetime Free Upgrades you get guaranteed when you buy it. So not only are you getting all the new updates, you're getting them without having to pay anything extra!
It's also worth noting that this isn't the typical pricing model in the DAW world, as most other developers will put their numbered updates behind a paywall, so that when a new version drops, you have to pay an upgrade fee.
But not so with FL Studio. You buy it once, and you own it for life.
This is particularly relevant because FL Studio 21 released at the back end of last year, and it brings with it a host of new and exciting features.
So, in this guide we are going to explore some of the new features in FL Studio 21 and see exactly what's changed. We'll cover what some of the biggest new changes are, and discuss what that means for us as FL Studio users going forward.
In this guide we will cover:
- Audio clips
- New UI and Theme options
- Improved Browser functions
- New Plugins
- and more!
So, let's dive right in!
FL Studio 21
It's been four years since Image Line last released a new version of FL Studio, version 20. In these four years the developers have been anything but idle. The best thing about being a music producer is often when your DAW gets an update and you get some exciting new features to mess around with, and Imagine Line did not disappoint with FL Studio 21.
Image Line are great because they listen to what the (very vocal) FL Studio community wants, and they deliver. Many of the newest features in this latest version are things people have been requesting for a long time. We have faster and more precise audio editing, improved content discovery, control over the look and feel of your DAW and some really exciting new plugins to sink our teeth into.
Let's start off with the Playlist.
New Playlist Features
The Playlist is where you arrange your tracks in FL Studio. It's similar in function to the timeline based linear views in other DAWs, and it's now got some exciting new features to help your work in FL Studio come along even faster.
The biggest new updates to the Playlist is the introduction of Audio Clip Fade In/Out and Gain Controls. It's important to point out too that these are per clip instance, rather than being per channel. Straight away we can see that this gives a new and precise way of working with audio in FL Studio. This is especially important because working with audio in FL Studio has always been less feature rich than in other DAWs, so it's great that we're getting these clip features in FL.
Let's see how they work.
Audio Clips

You can see in the image above some of these features in action. There's now a fade in and out at the beginning and end of each clip. To apply a fade in, simply click the top left of the clip and drag inwards. Similarly, applying a fade out uses the same process from the node in the top right.
The Clip Gain control is present in the bottom, allowing for adjustment in the gain range from -inf to +36dB of gain adjustment.
The Fade Editing Controls can be toggled by hitting the button labelled Show Fades in the image above, or simply by clicking Shift + F.
You can also see in the image above that there are crossfades between the two clips. By default, dragging an audio clip into another will automatically create a crossfade between them. It's worth noting that you can disable these crossfades in the Project Tab.
It's possible to show or not show Fade/Gain previews, and if you have made any gain adjustments, the gain value will still be visible even if you've turned the waveform previews off. You can hold Alt for temporary previews of the waveforms even if you've turned them off in the Playlist menu.
Other Playlist Goodies
Another of the exciting new features making its way into the Playlist is the much requested ability to Paste at the Playhead.
You can copy notes and clips, and paste them into the Playlist or Piano Roll at the position of the Playhead.
Simply use your well known copy and paste key commands to get this done.
On a related note, any new clips added to tracks and now placed at the playhead position too, or inside your current selection.
In terms of workflow, this is a godsend! It's all about improving the efficiency of what we're doing, and changes like this really help you to make that happen.
Another fantastic feature in the Playlist is the ability to add audio files sequentially.
Previously, if you dragged several audio files into the playlist, it would separate them into different tracks. Now, however, your selected audio files are placed on the same track in the order you selected them.
This is really useful if you're navigating through the browser and selecting samples you want to use on the same track. We talk about this a lot, but the time this saves you may seem small and inconsequential - after all, how long does it take to move things over onto one track and then delete the unwanted ones? - but it all adds up! And it's this efficiency of workflow which is really useful when it comes to be a music producer in this day and age!
There's also a New plus button in the Playlist, for quickly adding new tracks. You can left click for instruments and right click for audio tracks!
Another fun feature is the ability to chop clips for all clip types, and multiple selections. This makes it possible to get some really fun chopped effects on your clips!
So that's an overview of the new features for the Playlist. Now let's move on to some of the other goodies!
New UI Options
One of the reasons FL Studio is so beloved is the ability to move things around and customise them. Well, this just got even more possible with the new options for themes for the UI.
You can now change the look of FL Studio even more than you could before, by choosing from a selection of preset themes, finding custom themes online, or by tweaking the colours and highlights yourself.
I personally love this, because I'm a sucker for being able to change the appearance of a program to suit just how I like it.
While this may seem superficial, I think it has a direct impact on your music making. It's all about setting the mood.
Check out this PS2 theme below!

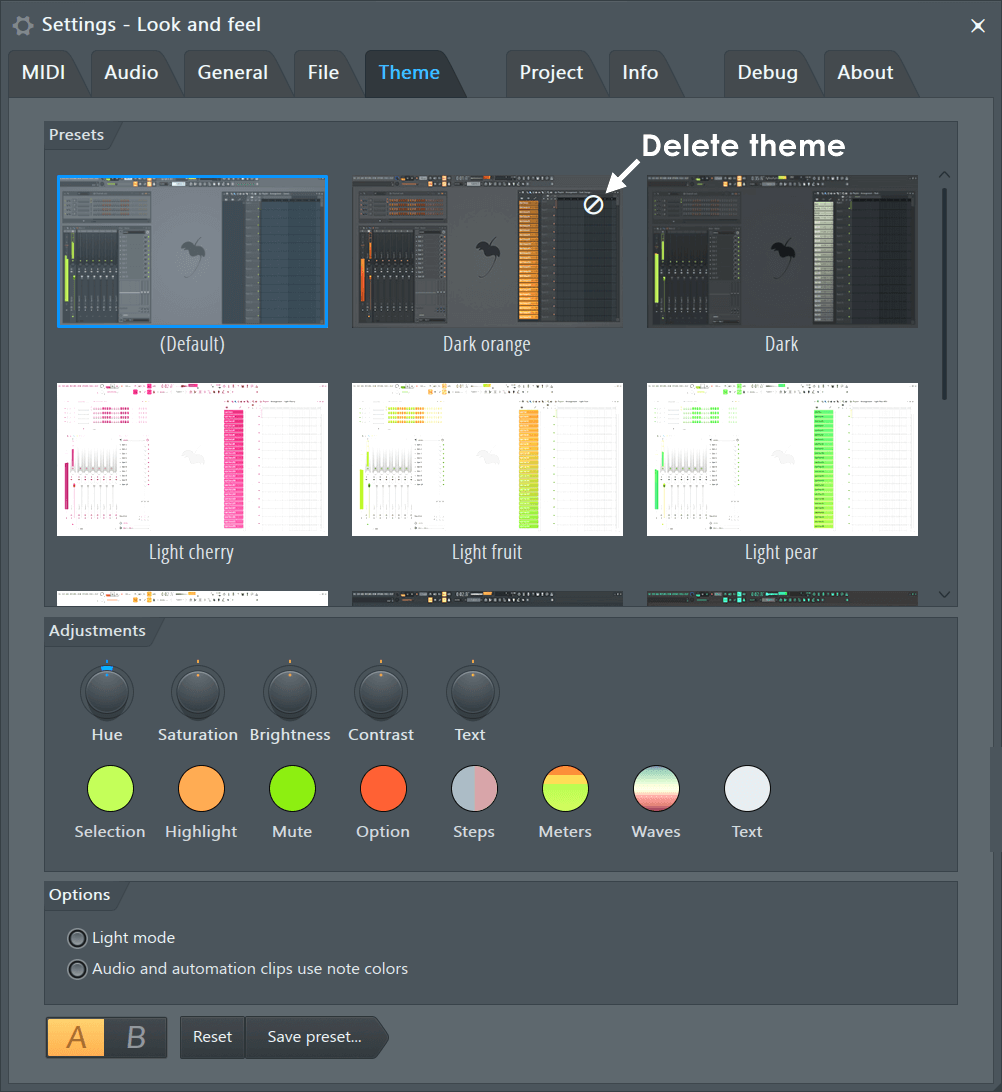
To edit the theme and look of FL Studio 21, head over to General Settings > Miscellaneous > Theme.
You can actually get pretty in depth with the editing of your theme and appearance, changing the overall mood of FL Studio to suit your style!
Improved Browser Functions
The Browser in FL Studio 21 has had an overhaul, giving much better functionality to help you get the files and plugins you need.
Some of the things you can do in the new Browser are:
- Preview Samples from the middle. Just hold Shift and click the sample preview to play from that point, and you can adjust the preview volume too.
- Search for tags that you can assign to plugins, presets and samples. This is great for improving your organisation in the browser.
- Search for file types. If you put your query in quotation marks, you'll get an exact match for that name.
What's great about this new Browser is how fast it is! When you first open FL Studio, and index file is built. So the browser references this when searching your drives, for lightning fast results.
If there are any changes in your folders that are being monitored by this index, FL Studio will rebuild the index to adapt.
Another neat feature is that it supports multiple selection, which is great for when you're dragging in multiple samples into the Playlist!
I've mentioned in recent guides how important organisation is for an efficient workflow, and a new addition to the Browser in FL Studio 21 is the inclusion of favourites. You can now go through your Browser and favourite samples, presets and plugins, and they will all show up in your dedicated Favourites section.
The Tabs in the browser have been revamped too, allowing you to clone tabs which you can customise and you can also freeze tabs. This second option is great for pinning in place folders you use to work often but might be hidden in sub folders.
There's been another change to the Browser which has been in the works for a while based on user requests, and it's how external content is managed. Where in the past there was the IL Downloads app from which you could download packs and samples directly from Image Line's store, which was then replaced by manual downloads.
Now, the Browser can now download content for you so you don't have to leave FL Studio to get hold of your extra plugins.
New Plugins
It's always exciting when an update for your DAW contains a new plugin, and FL Studio 21 contains four new plugins for us to sink our teeth into.
We have the following:
- LuxeVerb - Advanced algorithmic reverb with a luxurious and malleable sound.
- Vintage Phaser - Inspired by the 1970s Electro-Harmonics Small Stone Phase Shifter.
- Multiband Delay - Splits incoming audio into 16 frequency bands and allows you to delay each band individually. This one is amazing for sound design!
- VFX Sequencer - A pattern arpeggiator and step sequencer designed to be used in Patcher to send note sequences to connected instrument plugins.
These are some really exciting additions to FL Studio, so let's dig into them a bit more to see what we are working with.
LuxeVerb
I love the UI here, but there's a lot more to LuxeVerb than just a pretty interface.
LuxeVerb is a totally new reverb plugin, with advanced features based on non-traditional techniques, giving you the possibility to have reverb tails as diffused as you possibly want them to be!
It's billed as a brand new Deluxe reverb plugin. But is this just marketing? Or is there something to it?
Well, LuxeVerb is an algorithmic reverb based on clever use of delay lines, compared to traditional reverbs which use acoustic space modelling to achieve the reverb sounds. What's really cool in LuxeVerb is that it allows for some really amazing processing of your reverb tails, which just wouldn't be possible using other reverb plugins.
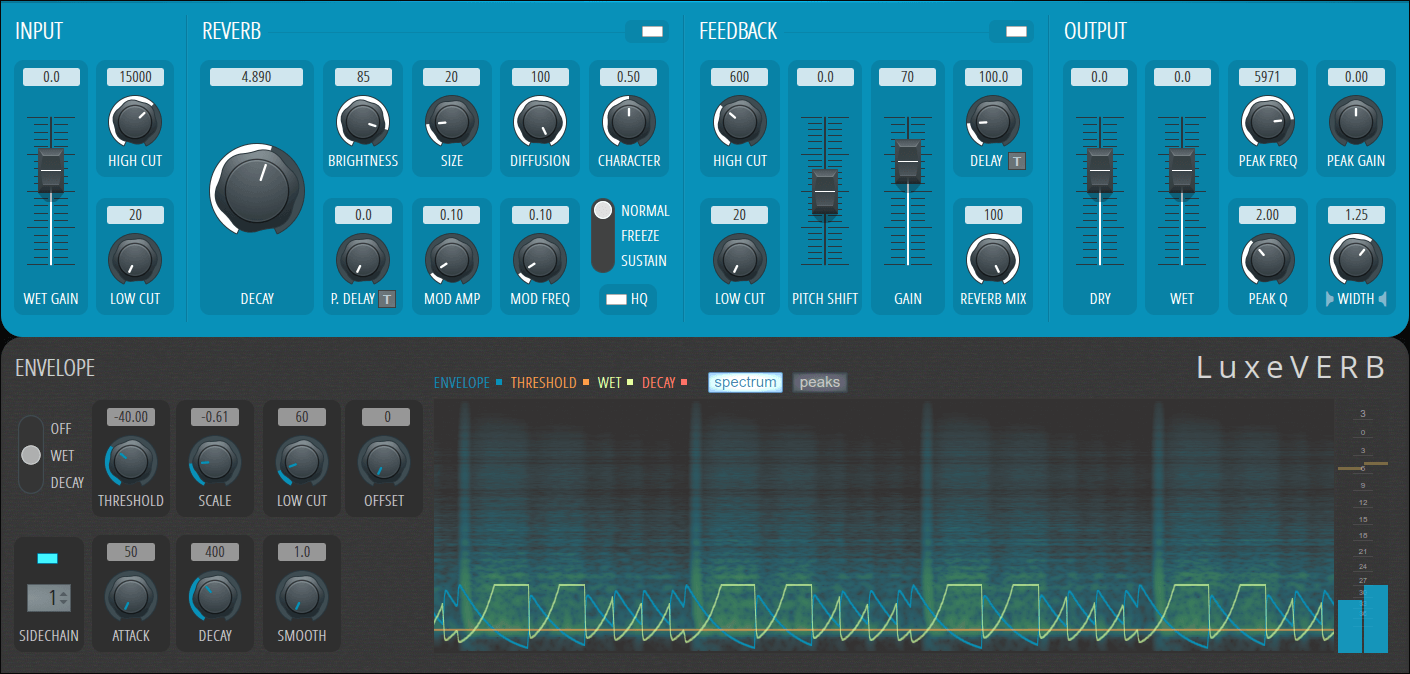
So, you have several panels in LuxeVerb, which you can see labelled across the top of the UI.
There are; Input, Reverb, Feedback, Output and then there's also the Envelope panel along the bottom with that gorgeous visualisation display.
First let's look at the Input Panel.
This is where you control the signal coming into LuxeVerb, with the Wet Gain fader giving you control over the level you're sending into the input of the reverb signal path. This can be automated for some amazing reverb effects, you can quickly increase this at the end of a sound to get a lush reverb tail. There's a limiter built in here too, which will flash red when you reach a certain point, giving you a warning that the sound will be changed if you don't lower the gain. But sometimes you might want that crunchy distorted sound!
You've also got a High Cut control, as well as a Low Cut. The latter control is useful, because it attenuates the low frequencies coming into the reverb, which can cause some unwanted muddiness if you're not careful.
The second panel is the Reverb Panel, which has a toggle control at the top right to help save CPU if you're not using it. Just turn it off when you don't need it activated. It will stop all sound in the unit.
The basic controls in this panel are as follows:
- Decay - This is the overall duration of your reverb tail. Approximately in seconds to the -60 dB level. However, if you're using the feedback section, things can get wild here.
- Brightness - Presence of high frequencies in the reverb tail. Set to 100% for the brightest sound, and reduce in order to dampen the high frequencies. Used in conjunction with the High and Low Cut filters on the Input panel, you can really sculpt the frequency characteristics of your sound.
- Size - This control changes the spacing of the individual echoes within the reverb. This is used to convey a sense of room size, as longer distances between the echoes mean the room is larger. However, unlike in a real reverb, this control doesn't change the length of the reverb tail. If you move this around while the reverb is playing you'll get some smooth (but drastic) pitch changes in the reverb.
- Diffusion - Diffusion in reverb is caused (in real spaces) by things like furniture in a space; things for the sound to bounce off. This control emulates this by adding in simulated acoustic diffusers in the input path before the reverb. These break up the regularity and predictability of the echoes you're hearing. Use this to choose between smooth or grainy sounds.
- Character - Determines the structure of the echoes that make up the reverb response. Set midway (0.5) for the smoothest and most diffuse reverb tail. Use smaller values (< 0.5) for a 'grittier' reverb, where individual echos are more prominent. Using larger values (> 0.5) causes the reverb arrivals to bunch up, creating a fuzzy-echo effect. You can hear this effect more prominently when the Size control is high.
-
P.Delay (Pre Delay) - The time it will take the reverb to start making sound, in milliseconds.
- T - Tempo sync. Pre-delay will be tempo-synced, in steps.
- Mod Amp - Amplitude of modulation of delay line lengths in the reverb model. This control produces a chorus-like effect in the reverb tail. The Character control has an influence on how noticeable this is.
- Mod Freq - Frequency of modulation of delay line lengths in reverb architecture. Using higher values will cause the modulation to be faster and more noticeable.
-
Freeze Mode - Allows for infinite length reverb tails. Chose one of the three modes. Due to the design of LuxeVerb, you can get these delay lines sustained indefinitely, giving some really fun results. You can also automate this switch, which makes the possibility of freezing your reverb tail mid song very exciting!
- Normal - Freeze Modes disabled, for a standard reverb decay.
- Freeze - Cuts the input to the reverb and sustains the sound at the moment Freeze was selected. The sound will sustain until Freeze is deselected.
- Sustain - Similar to Freeze, but the input to the reverb is left open, so the sound will continue to build, based on the input signal.
- HQ (High Quality) - Toggles between interpolation modes. HQ On – Higher fidelity with more sustained high frequencies, at the expense of some additional CPU usage. HQ Off – Interpolation is grittier and the high frequencies die out more quickly.
So as you can see, there are a number of precise controls in LuxeVerb, and the possibilities for endless reverb tails gives some really exciting options for your music. Having a reverb in which you can get this level of precision and control is a great addition to FL Studio 21.
The Feedback Panel can be toggled on and off, and it controls LuxeVerb's internal feedback lines. It allows pitch shifting of the feedback for creating shimmer and other related reverb effects.
If you turn up the Feedback Gain, you can hear things start to happen, and then adjust the pitch shift slider to your desired amount.
You've also got Low and High Cut filters here, as well as a Gain control with a built in saturation. Just like the Wet Gain in the Input Panel, this fader will begin to flash red when you're hitting the saturation, letting you know to turn this control down to avoid any distortion in your feedback loop. However, you might want some distortion in your feedback, in which case you should turn it up!
The Feedback signal enters your reverb's signal chain after the Input Low/High Cut filters, Pre Delay and Diffusion step of the reverb, but before the rest of the controls of the Reverb engine. This means that the main components of the reverb engine are included inside the feedback loop.
The Delay parameter is applied to the output before being fed back into the loop, it can be in milliseconds, or tempo synced. You also have a Reverb Mix control to blend the reverb processing into the feedback path.
Using this Feedback section, it's possible to get some really lush shimmer reverb effects, and it's worth experimenting with to tailor your reverb sound exactly how you like it.
The Output Panel is pretty self explanatory, so we won't go into it much here, simply play around with it or check the support documentation to get precise info on the controls.
Now, how about that Envelope Panel? Isn't it amazing!
This section allows you to modulate the reverb decay or Output Wet parameter based on the dry input, or a side chained signal. Both of these parameters allow you to control how the reverb output decays.
You can use this section to create Gated Reverb without actually using a gate.
The basic controls are as follows:
- Threshold - Sets the threshold (in dB) above which the envelope signal causes modulation, similar to the way that a standard compressor works.
- Scale - Controls how much the input signal envelope as applied to the modulation target. Positive values lead to 'gated reverb', where the reverb tail bursts through or negative values that lead to 'sidechain reverb' where the reverb tail dips (or ducks). This is normally used to allow space for percussion to punch through.
- Low Cut - Applies a low-cut filter to the input of the envelope follower, in order to remove low frequencies. Cutoff frequency in Hz. Can be useful to have the Envelope follow transients which tend to be higher in frequency. Low frequencies can confuse the envelope follower, which this control can help to avoid.
- Offset - When set to 0, the modulation is mono-polar. If > 0 then the modulation is bipolar.
- Attack - Controls the attack time on the envelope follower. TIP: Normally leave this set to minimum.
- Decay - Controls the release time of the envelope follower. Smaller values lead to the target value (Wet or Decay) returning to the set value quickly after the input signal level decays, whereas larger values cause the envelope follower to slowly drift back down to the input signal amplitude level.
- Smooth - Smoothing applied to the envelope input signal (smoothing time in ms). Turn this up if you want to follow the general trend of the input signal level, rather than following all of the minor fluctuations.
My favourite part of LuxeVerb, though, is the display in this section. This includes a range of different visual analysis tools which help you to better understand the processing going on inside LuxeVerb.
Here you will see a spectogram, a waveform visualisation, or both, of the output signal post-LuxeVerb. Essentially, you're seeing a visual representation of the signal after the reverb has been applied to it.
Overlaid on top, are graphs representing Wet Level in Green, or Decay Time in red. You also have Envelope Threshold in Orange, and Envelope Output in Blue. These are great to keep an eye on as you're making changes to the processing in LuxeVerb.
I love this kind of visual representation of the signal processing in plugins - it gives a whole new dimension to the sound possibilities, and having the ability to precisely monitor what's going on just makes things easier!
I'm super impressed with LuxeVerb, but it's not the only new plugin in FL Studio 21!
Vintage Phaser
This is another of the fun new plugins included in FL Studio 21. Modelled after the Electro Harmix Small Stone Phase Shifter, Vintage Phaser is emulates the 1970s guitar pedal to bring you some lush phasing goodness to your tunes.
Despite the original being designed as a guitar pedal, it's gained recognition over the years by having synths fed through it, so it's now built into FL Studio 21 for you to use on any sounds you can think of!
Phasing is a sonic phenomenon which sounds a lot like multiple different frequencies fading in and out of volume at the same time. A good real life example of this is the sound of a jet plane flying overhead. But in a music production sense, what's happening?
The phasing sound is the result of phase cancellation, and in a plugin, you mix a copy of a sound into itself, which is slightly delayed at certain frequencies. This is referred to as a Phase Shift, and if you move the delay timing slowly, you get a phaser.
So we have Vintage Phaser. Vintage because it's based on a 1970s pedal, and a phaser because of the reason we just described!
Let's explore how to use it.
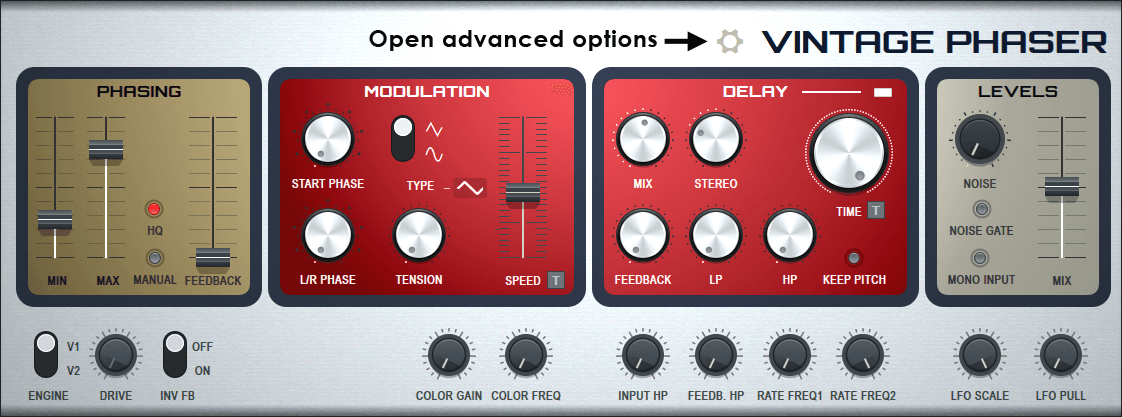
Vintage Phaser is split up into several panels. The first of these is the Phaser panel.
Phaser Panel
A Phaser traditionally works by modulation between two phase states. There's the Minimum frequency, and the Maximum frequency, and it's the modulation between these two that gives us that classic phase effect.
You'll notice that the Phase Panel has these two controls as sliders. Using each of these, you can control the minimum/maximum frequency that your Phaser is going to modulate between.
There's also an LED toggle labelled Manual, which replaces the two Min/Max sliders with one Frequency slider which allows you to manually adjust the phase frequency. It's a really good idea to automate this one and have some fun with it!
Finally in this section, there's the Feedback Slider, which controls how much of the Phaser Panel's output is fed back into its input, and more feedback results in a sharper phasing sound.
You can engage oversampling with the HQ toggle, which results in a higher quality (thus less vintage) sound.
Modulation Panel
We mentioned that the Phasing is the result of modulation, and it's the LFO that helps achieve this. This is where you get to decide how the phase moves between the Min and Max frequencies.
The are options for tempo syncing the LFO controls, as well as the fact there are actually two LFOs here, one for the left channel and one for the right. You can increase the presence of stereo effects by adjusting the L/R Phase control.
Here's a full breakdown of what each control does in this section:
- Start Phase - When LFO speed Host Sync is active, the LFOs will restart at this Phase (while still taking the Left/Right Phase Difference into account).
- Type (Switch) - LFO waveform (Triangle and Sine).
- L/R Phase - Left/Right Phase Difference. There are 2 (dephased) LFOs used in the Phaser. This parameter will change the phase between them. Greater dephasing equals greater stereo effect.
- Tension - Modify the LFO shape to simulate 'wonky' and degraded electronics or a sagging battery.
-
Speed - LFO Speed active when Custom mode is used. Will change the speed at which the Phaser' LFOs repeat. In Tempo mode use (Right+Click) > 'Set' to choose Tempo-matched values.
- Tempo Sync (Switch) - When activated the LFO waveform is synced to the project Tempo.
Delay Panel
So the third panel in VIntage Phaser is the Delay Panel. This is where you can control a built in delay effect to make your phasing even more weird and wonderful. You can activate this entire section using the toggle switch at the top.
The Mix control needs no explanation, while the Feedback control is for the delay only, and doesn't effect the Phaser feedback.
You have your delay time control which can be dialled in in ms or in steps using the tempo sync control.
There's also a neat Keep Pitch button which maintains the pitch while the delay is modulated.
Turn the Stereo control to either the left or the right to delay the respective channels, and we also have a High and Low Pass filter for the delay path here too.
Advanced Controls
So, you aren't limited to the panels on Vintage Phaser for the controls, you can click the gear icon next to the name to reveal some advanced controls too.
These advanced controls are as follows:
- Color Gain - Gain of additional Low-Shelf post-phaser stage.
- Color Freq - Frequency of additional Low-Shelf post-phaser stage.
- Input HP - Cutoff frequency of input high-pass
- Feedback HP - Determines cutoff frequency of high-pass in feedback path.
- Rate Freq 1 - Minimum LFO frequency. This is the frequency when SPEED Slider is at minimum (with Tempo Sync off).
- Rate Freq 2 - Maximum LFO frequency. This is the frequency when SPEED Slider is at maximum (with Tempo Sync off).
- LFO Scale - The higher the value of this parameter, the smaller the LFO's output amplitude gets as its speed increases. When this parameters is 0, no scaling of the LFO's output amplitude happens with increased speed.
- LFO Pull - LFO Maximum depth Pull Down. The higher the value of this parameter, the more the phaser frequency gets pulled down towards 0 as its speed increases.
Multiband Delay
If the above new plugins weren't exciting enough, we've got more to play around with!
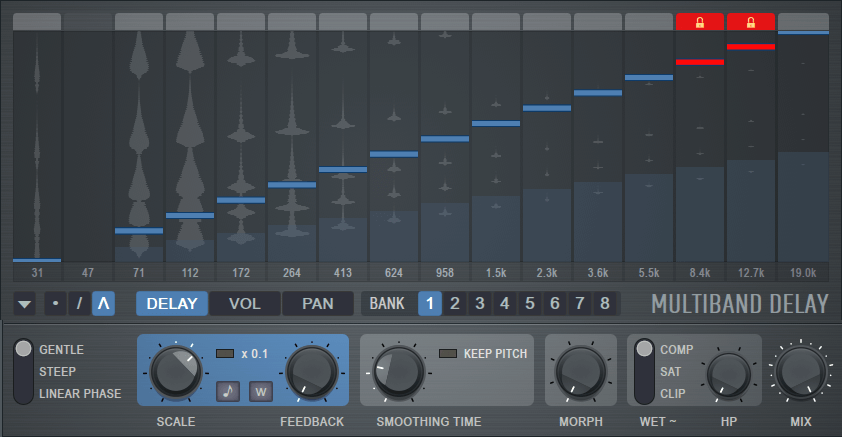
This is Multiband Delay, the new and exciting new sound design tool available in FL Studio 21 Producer Edition and above.
Similar to the way multiband compression works, the Multiband Delay plugin splits the incoming signal into 16 frequency bands which you can then apply delay effects to individually.
There's a really neat visualiser which shows you the waveform characteristics of each of the bands, and an indicator to show you where the delay is.
This is a really fun plugin to mess around with, so it's best to mess around with it see what you can get out of it!
VFX Sequencer
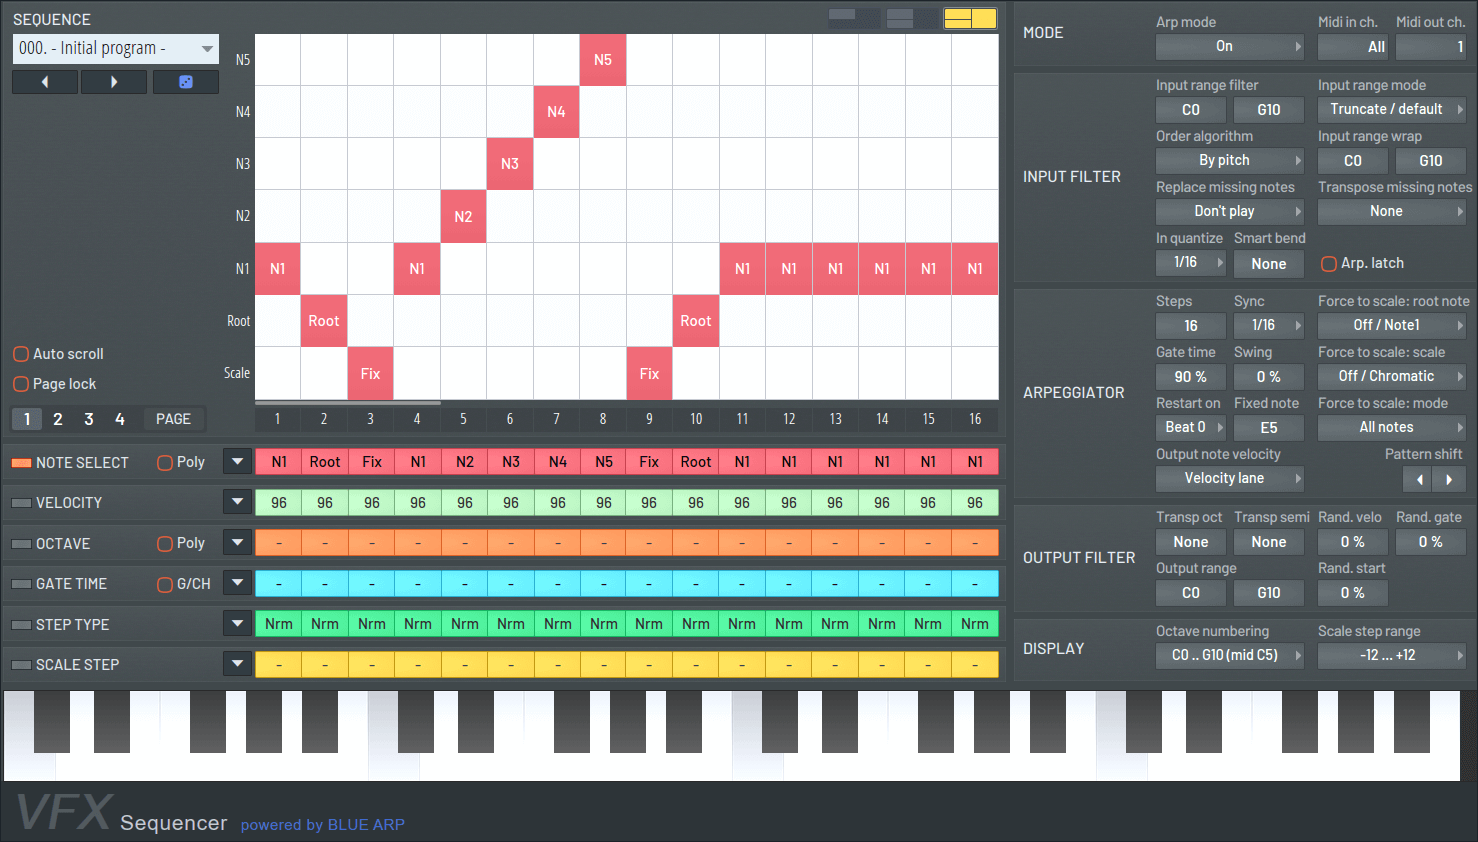
The last of the new plugins included in FL Studio 21 is VFX Sequencer, a device which takes note input from the piano roll or a MIDI controller, and then transforms chords into melodic phrases according to the pattern you program, or the patch you've selected.
This device is a pattern arpeggiator and step sequencer designed to be used in Patcher to send note sequences to connected instrument plugins.
This device is really cool because it helps bring some movement and life to your MIDI, it can arpeggiate, filter notes by pitch and even play entire chord progressions with a single note input.
You get complete control over what each step of the sequence does, meaning the possibilities for creating your own unique patterns from this are endless!
FL Studio 21
As we've seen, there's a lot of exciting new features to get up to speed with in FL Studio 21.
From the improved Browser, to new plugins, and more, you won't be without things to do next time you open up FL.
It's also worth noting that we didn't even get through all of the new changes, as there have been several plugins which have just been slightly updated, as well as a wider range of general improvements and quality of life fixes. You can see all of the full patch notes over on Image Line's website.
All of this is made so much more exciting because of the lifetime free upgrades guarantee that comes with a purchase of FL Studio. It's fun to look at all of these new features that have been included and know you don't need to pay anything extra for them, and the same will be true for ever. So every new future update will also drop and you'll know you've got it for free!
Thanks again for checking in with us here at FLPstudio.com, and make sure you check out the rest of our blog for exciting news, tips and tutorials regarding FL Studio. You should also check out the deals we currently have on our FL Studio Remakes.
We have an international team of professional producers recreating some of the biggest tracks in the EDM scene in FL Studio, and you can download these recreations and really dig into them to see what elements go into a professional track. This is a super great way to learn some invaluable tricks for your next project.
Make sure you come back soon!