The Power of FL Studio: An In-Depth Review
Posted by Esteban Miranda on
Image-Line, the company behind FL Studio has a producer recognition program called FL Studio Power Users. Essentially, if you have significant musical achievements, a large reach on social media platforms, and/or are a positive role model for budding producers, you can be officially recognised as an FL Studio Power User.
I really like this distinction, especially because of the name. It explicitly alludes to the power of FL Studio, which is significant because of how much FL used to suffer from its reputation as a toy.
But these days, there is so much packed into FL Studio, that it stands as one of the most popular DAWs out there, especially within the electronic music scene. We will see exactly why this is later on in this review.
So, today we are going to look in depth at what makes FL Studio so powerful.
We will explore:
- How FL Studio differs from other DAWs
- The specific features which make it a powerful DAW
- How you can get the most out of FL Studio
- and more!
So, let's dive in and take an in-depth look at FL Studio.
FL Studio at a Glance.
FL Studio has a loyal and often very vocal fanbase. It is an iconic DAW, with professional-grade native plugins, superb functionality and a range of different editions to suit every budget. Loved by newcomers for its easy to learn workflow, FL Studio is unique in its approach to several elements of the music production process.
It's such a favourite in the electronic dance music producer community in particular for its ease of approach to this type of music making. After being an Ableton Live and Logic Pro user for such a long time, I've found that FL Studio has been a breath of fresh air in terms of the workflow. We will go into more detail on this later on in the guide.
For this guide, we are going to focus on the All Plugins Edition of FL, since this is the truest representation of FL Studio at its best, and it would be difficult to do an in-depth review without focusing on some of the best parts. All Plugins Edition includes all of the native plugins and features, and it is through these that you get the best appreciation of the power of FL Studio.
Let's have a more detailed look.
Price & Upgrades
The All Plugins Edition of FL Studio comes with a great range of fantastic plugins, though the price is quite high compared to Logic Pro, which is famously $200 for its full version. In comparison, the All Plugins Edition of FL Studio costs $499.
There are four versions of FL Studio to choose from, each of which has a different price point and is aimed at a different audience.
Compared to the All Plugins Edition we mentioned above, the Fruity Edition is $99 and is aimed at people who want to make music entirely "in the box", meaning using only plugins and instruments within your DAW. It doesn't allow the ability to record audio or manipulate audio clips. There are two more editions in between Fruity and All Plugins, you can check them out on the website here.
What makes FL Studio so attractive purely from a price standpoint though is that you get lifetime free upgrades. This means you only ever have to purchase it once, and then all future upgrades - including numbered ones - are free.
This makes FL Studio an extremely competitive contender in the world of DAWs, because many others require payments for upgrades.
Interface & Design
 This is one of the most important aspects of a DAW, but it's easy to overlook. You're going to be spending a lot of time at your DAW making music, so you want to make sure that you choose one with a UI to your taste. It's also a very significant part of what makes FL Studio great, because its design and UI is so different from other DAWs.
The UI and overall experience for FL Studio compared to other DAWs is unique. I mentioned earlier that I've been using Ableton Live and Logic Pro for a number of years, and all of my experience has been on these linear, timeline based DAWs, where the approach to music making is generally consistent. Sure, Ableton Live has Session View and Logic has Live Loops, which bring a break from this linear workflow to some extent, but neither of these give you the type of focused approach to music making you can take with FL Studio.
If other DAWs are programs which contain the individual tools for your music production experience, FL Studio works more like a digital hub in which all of the different elements of songwriting exist in their own individual windows. It almost helps to think of them as mini apps within the home hub of FL Studio.
These are where you accomplish a certain task within the context of making your music, such as creating ideas, mixing your audio, or constructing the overall structure of your music, and they each feel very distinct and separate. Compared to other DAWs, this is unique.
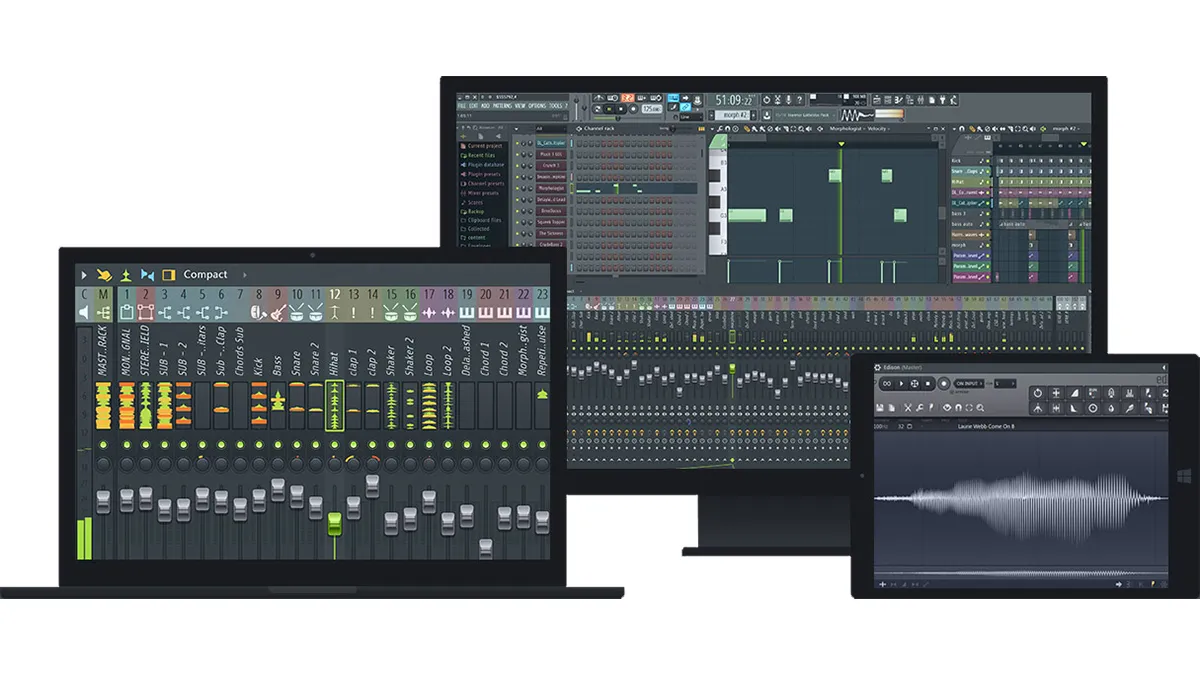
This is so great because it allows you to direct all of your focus onto one single element at a time, which you can see pictured below. You can minimise windows you don't want to see, giving you a much more streamlined approach.
One of these windows is the Channel Rack. It's probably the first tool you'll reach for, and it's super useful for creating beats and ideas. It's one of the staple tools of the FL Studio user, forming a beat grid on which you can sketch out your ideas quickly and intuitively. It feels similar to the approach you'd take with some hardware step sequencers. This is why FL Studio is loved by electronic music producers because the step sequencing power is so good.

Taking a bigger picture view, the entire interface of FL Studio is very visually intuitive once you understand what you're seeing. It's easy to read, despite how complex the individual sections may be, and the UI is fully scalable, even across multiple displays. A really neat feature is the integration of touch-screen monitors. If you have one, you can use touch controls within FL Studio to enhance your experience. Try moving multiple faders at a time in the mixer!
Your basic areas of the UI are the Browser, Channel Rack, Mixer, Playlist and Piano Roll.
- The Browser in FL Studio is your hub for all of your presets, plugins and samples, and for generally navigating your project and the files you're using in the current project itself. You can also load in your own folders of audio samples or plugins.
- The Channel Rack is where you will sketch your ideas for beats. It houses whatever sound generators you're using, and you can drag and drop sounds and samples onto it to quickly begin creating ideas. You can either use the Step Sequencer to sketch out rhythmic ideas, while changing to the Piano Roll to create melodic content.
- The Mixer is where you'll balance your levels and work on your mix. It's pretty similar to mixers in other DAWs, with a key difference being that you have to manually assign tracks to the mixer channels unlike in other DAWs.
- The Playlist is the timeline based arranging window where you will create the structure of your track. This is the section of FL Studio that looks most like other DAWs, and will be most familiar to users of the likes of Logic Pro or Ableton Live.
- The Piano Roll is where you will create all of your melodic content. It's lauded as the best piano roll in the business, and we will go over exactly why that is later in this guide.
What makes FL Studio so unique is that it allows you to adjust the size and placement of all of these elements within your main FL window. This gives the DAW a certain level of visual customisability which you don't necessarily see in other DAWs. You can tailor your workflow to suit your process, moving and showing/hiding windows with the main screen as and when needed.
There is definitely a very visual nature to FL Studio, allowing you to discern information about your music using your eyes as well as your ears. It's intuitive and easy to get the hang of, despite the complexity which is present in the features. Overall, it's very different to other DAWs, but it's quite easy to pick up and learn.
Visual Customisation
One of the reasons FL Studio is loved so much in its community is the level of visual customisation present in the software. You can change the visual theme for FL Studio like you can for the likes of Ableton Live, but there is a lot more you can do to make FL Studio yours. You can change accent colours, making it possible to customise FL Studio to a degree not seen in other DAWs.
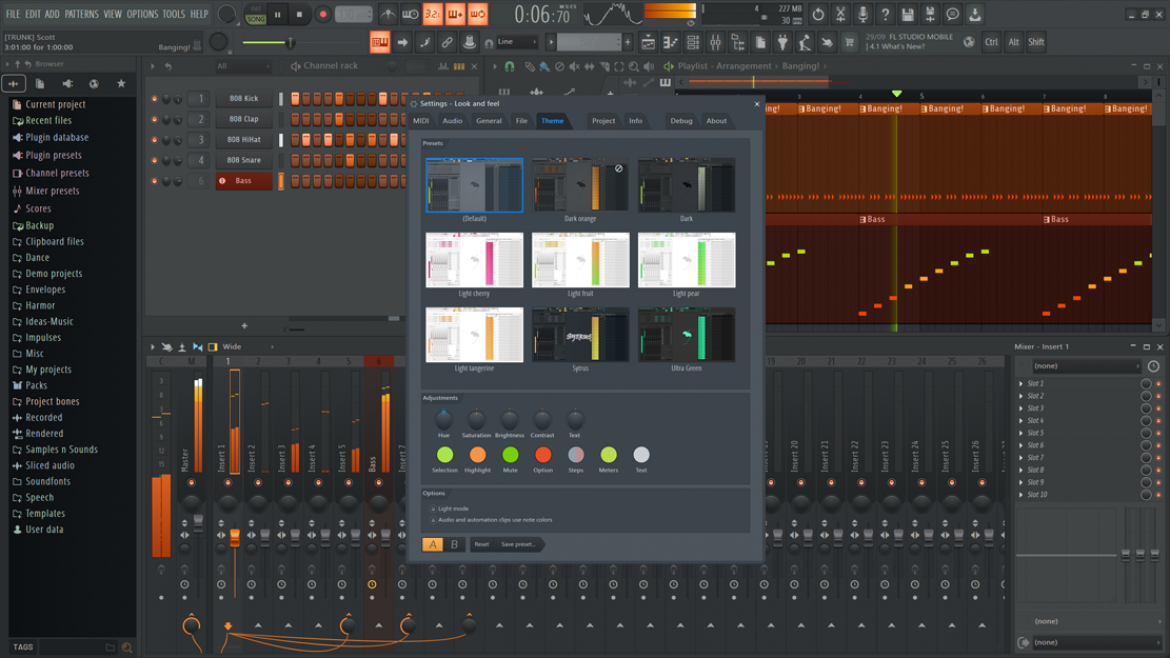
Each individual element in FL Studio can be moved around, and you can also set a background wallpaper just like you can on your desktop. I find this gels well with the earlier analogy of FL Studio being its own little mini hub for a bunch of different apps. The wallpaper gives it that desktop feel which helps solidify this image. While the wallpaper customisation is purely a cosmetic option, the ability to drag and drop the individual elements such as the Mixer, Channel Rack or Browser and resize and arrange them to suit your workflow is something that makes FL Studio super versatile.
Speaking of Workflow, FL Studio is set up quite differently from other DAWs, so let's explore it a bit further.
Workflow
FL Studio is the ideal DAW if your music production interest is primarily based around creating loop-based electronic music. Having said that, you'll find a remarkably flexible DAW in FL Studio, one that allows you to tailor your workflow to your needs, as we've said, because there may be several ways to do one thing.
The reason FL is so good for making loop-based electronic music is because the basic workflow of FL Studio is built around Patterns. These are created in the Channel Rack, where you can use a step sequencer or piano roll input to generate your musical ideas. Once you've done this, you've got a Pattern. You can then drag this over to the Playlist and begin arranging your ideas. The Channel Rack is the central hub for all of your musical information. You can select different channels in your Channel Rack to create different patterns.
Following this logic, each project is made up of a collection of Patterns—beginning with Pattern 1, which you can find underneath the transport. Once you're happy with Pattern 1, you can then change it to Pattern 2 and create a different variation or idea. You have several options for starting your ideas; by clicking on the 16th-note step sequencer buttons to draw in notes, or by right-clicking the channel and choosing Fill in Steps to get ideas down quickly.
You then have the Graph Editor which allows you to quickly change various parameters like velocity, tuning, release or pan, to name a few.
To add a new sound, head over to the browser and select Plugin Preset > Generator, and drag the one you want into the Channel Rack, either over an existing channel or after adding a new one. There are a whole range of really great generators here, from synths to drum machines and more. FL Studio boasts a big range of exciting plugins to sink your teeth into.
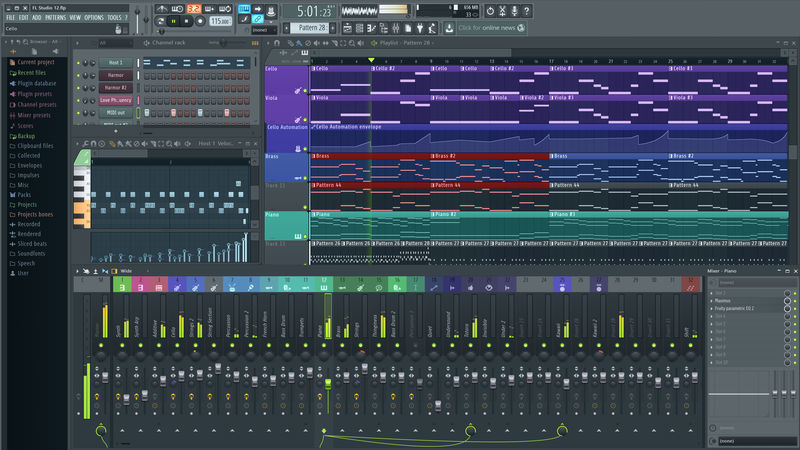
As you create Patterns, you move them over into the Playlist and this is where you arrange your song. You can see this pictured below. Any patterns you've created show up in the left hand panel of the Playlist, and you can drag them into the main area to begin arranging the structure of your track.
For producers coming to FL Studio from other DAWs, this is a novel way of working and may take some getting used to, while new producers starting on FL Studio before any other DAWs may find it easy to pick up quickly.

The Playlist is the most familiar to producers who used the likes of Logic Pro or Ableton Live, because it features a timeline based arrangement system where you build the structure of your track. I found this section of FL Studio most familiar because it uses the same basic way or working that other DAWs do. The biggest difference here is that you create your Patterns ahead of time in the Channel Rack, whereas in the likes of Ableton you create your musical ideas in the arrangement window as you work.
But it isn't just Patterns that you drag into the playlist to create your music. Any sound or sample can be dragged directly onto the playlist and be placed anywhere along the timeline.
Now, there's one thing we haven't properly explored yet, and that's the Piano Roll. While the Channel Rack's default layout is perfect for creating rhythmic patterns, you want a bit more control if you're working with melodic information. You can toggle the piano roll in the channel rack to control certain channels which contain a synth rather than a drum part.
The Piano Roll in FL Studio is a feature rich component with a tonne of controls.
Let's look at it in more detail.
FL Studio's Piano Roll

FL Studio's Piano Roll has the well deserved reputation of being the best one in the business. Earlier I mentioned that FL Studio differs from other DAWs because each individual element is its own window, and this idea really pays off in the Piano Roll because it is a standalone window, rather than being built into the DAW as in Ableton or Logic Pro.
Since it's a standalone Piano Roll, it is packed to the brim with features.
Along the top of the Piano Roll you will see a range of buttons. There's a dropdown menu in the top left with the Piano Roll Options menu. From here, you can save or load score presets, as well as accessing a range of other editing, selection and view options.
You also have a selection of tools, which are the second icon from the top left, this contains 18 different tools for the Piano Roll. One of the most impressive of these is Riff Machine.

This particular tool allows you to create chords or melodies quickly, using a range of different controls. Riff Machine is organised into 8 different steps, where you can choose .fsc score files and also customise settings for each step. You can also bypass individual steps by hitting the activate button next to the step name.
Using either a note progression you've created, or by importing an .fsc file, you can begin to create a melody or chord progression.
There's a Time Multiplier knob in the first step to allow you to adjust the length of the notes, which is a fun way to experiment.
Scrolling through Riff Machine moves between the different tabs, all of which serve to alter the sequence of notes in some way. This is a truly novel way of working, and it allows producers with limited knowledge of music theory to create ideas quickly.
This isn't the only tool in the Piano Roll tools section, though. There are other tools such as Quick Legato (Ctrl+L) which extends notes to remove any silence between them, or Articulator (Alt+L) which allows you to randomise the note length.
You will also find Quantize controls, as well as a lot of the controls present in Riff Machine as standalone controls.
These are just a highlight of the type of features present in the Piano Roll here. It has a depth that make the piano rolls in Logic and Ableton look lacklustre in comparison.
Another section of the Piano Roll is the Event Editor. It's the section along the bottom, and is where you will be able to control certain parameters of what's happening in your Piano Roll. You can use this section to program automated controls for a list of parameters for the target channel.
Using the Event Editor we can change individual note properties, or the entire channel's properties. This is where you go to control things like Note Panning, Velocity or even Note Release. You can also affect change to the entire channel, with parameters such as Channel Pitch, Channel Volume and Channel Panning.
The Piano Roll is undoubtedly one of the most powerful tools in FL Studio.
In conjunction with the Channel Rack you have all of the tools you need to sketch out musical ideas where the ideas are the focus, and you can move on to structure and mixing separately in different windows.
FL Studio's Mixer
I think FL Studio is a particularly good fit for you if you're easily distracted, because you can hide the windows you don't need to see, focusing your attention on one element at a time. For example if all you're working on is your mix, then you'll only have the Mixer window open. This means you're less likely to get distracted by the idea of going back into the Channel Rack because it's hidden from view. Out of sight, out of mind, as they say!
The Mixer window of FL Studio has some features in common with other Mixers in DAWs, but it certainly has a bunch of features which make it its own.

The signal routing in FL Studio is unique in that you have to manually assign the routing from channels in the Channel Rack or Playlist to corresponding channels on the mixer. They don't necessarily follow the numbering of tracks, so this is just something to bear in mind. Other DAWs are pretty straightforward in their routing; track 1 in your arrangement corresponds to track 1 on the mixer. Not so here.
In the Channel Rack each channel has a dropdown menu next to it with a number, this corresponds to a numbered channel on the Mixer. If the dropdown shows "-" this is routing directly to the master output.
The Mixer itself is split into several sections. There are the mixer insert tracks which receive signal from the Channel Rack or an external audio interface. You can have up to 125 of these tracks, labelled 1 - 125. You can see small wires along the bottom of the mixer, these are the send links which show where the signal exiting that track is going. These have a control knob which controls the amount of signal sent from 0 to 100%. If this is set to zero, the signal is sidechained. You can then click the small arrows at the bottom of your selected mixer track to control the routing to a target track of your choice.
By default, every mixer insert track is routed to the Master track, which is your overall output for your music. This is where you can apply mastering effects and plugins, if that's how you work. The Master track is the last stop before your audio exists FL Studio.
So, as you can see, the mixer requires a bit of understanding because of the ability to route signal as you see fit, rather than being given a default correspondence of tracks in your project to tracks in the mixer. It's different from other DAWs in this respect, but in reality it's no more complicated!
A great tip for getting the most out of the mixer in FL Studio is to organise your tracks. There are several methods of doing this which are available to you. The most important thing is to remember to rename your tracks after you’ve routed things to them. If you don't do this, it can be confusing trying to remember what's what, and confusion usually comes at the cost of time.
What you don't want to do is get to your mixing stage and realise you have to spend a bunch of time organising the mess you've made by not labelling things correctly. It’s always worth it to take the time to label your tracks.
There are a few ways you can rename a track in the mixer; select it and press F2; right-click it and hit rename; or center mouse wheel click. Hit Enter to save the name.
You can also organise your tracks by colour coding them, which is a super useful tool. It's great for organisation, but if you come up with a colour coding system, you'll know at a glance what tracks are what.
For instance, your drum tracks could be blue, bass could be orange, lead synths could be green, etc. You can change the colour in the same menu that you change the track name in.
I also like to bunch similar tracks together, it just makes sense from an organisation viewpoint. To move a track left or right, select it. While selected, hold down Alt and hit either left ← or right → arrow key to move the track over.
Mixer Functionality
Now, FL Studio's Mixer has several different view options, giving compact or expanded views of your mixer tracks. This is toggled in the top bar of options, where you'll find other controls for Mixer Options, Multi-touch Controls, Meter Wave View (pictured below) which is a fun way of showing waveforms in the mixer instead of peak levels.

If you're using FL Studio on a tablet or other touch screen enabled device, you can turn on Multi-touch control to allow touchscreen integration. This is really cool when using the mixer, because you can adjust multiple faders at once like a real mixing console.
To the right hand side of the overall mixer view, you see the Mixer Track FX panel. You can see this in the mixer image above. The Mixer Track FX panel is where you can assign effects to the selected track, so you'll be spending a lot of time here.
There are a wide range of controls on FL Studio's mixer, and it's best to get to know them by trying them out. You can find a full range of information on the FL Studio mixer and its controls by reading the official Image-Line support documentation.
The Verdict
FL Studio has come a long way since its original existence as Fruity Loops, the playful but super limited digital music playground.
Nowadays, FL Studio is a powerful and unique DAW, combining both traditional and novel elements to deliver a music production experience quite unlike any other. The workflow in particular is very interesting, and the ability to customise the interface with resizing and hiding/showing windows makes for a focused and dynamic user experience which you will struggle to find in other DAWs.
The Channel Rack is a standout feature for me, giving some great beat making functionality from the word go. It allows for precise, quick and intuitive beat sketching, and it's for this reason that FL Studio is loved by electronic dance music producers the world over.
It's possible to make amazing music using FL Studio, and this is shown off with the dozens of included demo tracks which sound amazing and show you the possibilities of what you can do with this software.
FL Studio has been steadily improved with each new iteration, and it has now secured its place as one of the biggest names in music production software. Over the years it's had a fresh new look and feel, a hugely updated suite of plugins and now holds its own against other major name DAWs.
With its easy to learn workflow, feature rich environment and focus on user experience, FL Studio could well be the DAW you're looking for!
Thanks for checking in with us here at flpstudio.com. While you're here, check out our deals on FL Studio projects, which you can download and load up into FL to see how a professional track is produced. We have an international team of producers working to recreate some of the biggest tracks in the EDM scene, and you can download these now to learn exactly how to creaft your own professional quality electronic dance music! Don't forget to come back soon to check out the rest of our blog and learn more about FL Studio and music production.